Since Spring 3, JavaConfig features are included in core Spring module, it allow developer to move bean definition and Spring configuration out of XML file into Java class.

But, you are still allow to use the classic XML way to define beans and configuration, the JavaConfig is just another alternative solution.

See the different between classic XML definition and JavaConfig to define a bean in Spring container.

Spring XML file :

<beans xmlns="http://www.springframework.org/schema/beans"
	xmlns:xsi="http://www.w3.org/2001/XMLSchema-instance"
	xsi:schemaLocation="http://www.springframework.org/schema/beans
	http://www.springframework.org/schema/beans/spring-beans-3.0.xsd">
 
	<bean id="helloBean" class="com.mkyong.hello.impl.HelloWorldImpl">
 
</beans>

Equivalent configuration in JavaConfig :

package com.mkyong.config;
 
import org.springframework.context.annotation.Bean;
import org.springframework.context.annotation.Configuration;
import com.mkyong.hello.HelloWorld;
import com.mkyong.hello.impl.HelloWorldImpl;
 
@Configuration
public class AppConfig {
 
    @Bean(name="helloBean")
    public HelloWorld helloWorld() {
        return new HelloWorldImpl();
    }
 
}

Spring JavaConfig Hello World

Now, see a full Spring JavaConfig example.

1. Directory Structure

See directory structure of this example.
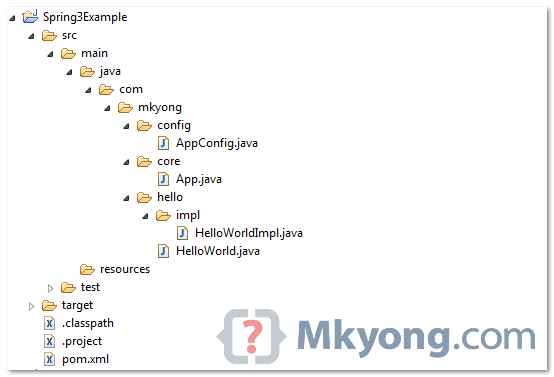
directory structure of this example

2. Dependency Library

To use JavaConfig (@Configuration), you need to include CGLIB library. See dependencies :

	<!-- Spring 3 dependencies -->
	<dependency>
		<groupId>org.springframework</groupId>
		<artifactId>spring-core</artifactId>
		<version>${spring.version}</version>
	</dependency>
 
	<dependency>
		<groupId>org.springframework</groupId>
		<artifactId>spring-context</artifactId>
		<version>${spring.version}</version>
	</dependency>
 
	<!-- JavaConfig need this library -->
	<dependency>
		<groupId>cglib</groupId>
		<artifactId>cglib</artifactId>
		<version>2.2.2</version>
	</dependency>

3. Spring Bean

A simple bean.

package com.mkyong.hello;
 
public interface HelloWorld {
 
	void printHelloWorld(String msg);
 
}
package com.mkyong.hello.impl;
 
import com.mkyong.hello.HelloWorld;
 
public class HelloWorldImpl implements HelloWorld {
 
	@Override
	public void printHelloWorld(String msg) {
 
		System.out.println("Hello : " + msg);
	}
 
}

4. JavaConfig Annotation

Annotate with @Configuration to tell Spring that this is the core Spring configuration file, and define bean via @Bean.

package com.mkyong.config;
 
import org.springframework.context.annotation.Bean;
import org.springframework.context.annotation.Configuration;
import com.mkyong.hello.HelloWorld;
import com.mkyong.hello.impl.HelloWorldImpl;
 
@Configuration
public class AppConfig {
 
    @Bean(name="helloBean")
    public HelloWorld helloWorld() {
        return new HelloWorldImpl();
    }
 
}

5. Run it

Load your JavaConfig class with AnnotationConfigApplicationContext.

package com.mkyong.core;
 
import org.springframework.context.ApplicationContext;
import org.springframework.context.annotation.AnnotationConfigApplicationContext;
import com.mkyong.config.AppConfig;
import com.mkyong.hello.HelloWorld;
 
public class App {
	public static void main(String[] args) {
 
            ApplicationContext context = new AnnotationConfigApplicationContext(AppConfig.class);
	    HelloWorld obj = (HelloWorld) context.getBean("helloBean");
 
	    obj.printHelloWorld("Spring3 Java Config");
 
	}
}

Output

Hello : Spring3 Java Config

Download Source Code

Download It – Spring3-JavaConfig-Example.zip (6 KB)

Reference

  1. Spring 3 JavaConfig reference


출처 - http://www.mkyong.com/spring3/spring-3-javaconfig-example/


스프링 3.0 GA 나오기 며칠 전에 쓰는 스프링 3.0 이야기.

Spring 3.0에 JavaConfig이 통합되는 과정은 그리 간단하지 않았다. M4까지 수년간 개발해왔던 JavaConfig을 완전히 코어 스프링 답게 대대적으로 변경시켜서 애노테이션 빈 설정의 자연스러운 한 가지 기능으로 통합시켰다. 기존 JavaConfig에서의 모습과는 그래서 큰 차이가 있다. 기본 아이디어만 가져왔을 뿐 완전히 새롭게 개발했다고 해도 지나친 말은 아닐 것이다.

아무튼. 자바코드를 통한 컨텍스트 설정이라는 이름으로 최종 정리된 @Configuration/@Bean 조합은 기존 @Component와 스테레오 타입 기반의 스캐너 자동인식 등록기능과 @Autowired로 대표되는 애노테이션 설정기능과 매우 긴밀하게 연결되어버렸다. 이 세가지는 거의 대부분 호환된다.

당연히 자동인식 @Component 클래스에는 @Autowired 같은 애노테이션 설정이 가능하다. 마찬가지로 @Configuration으로 만들어지는 자바코드 설정용 빈도 @Autowired를 비롯한 각종 애노테이션 설정이 먹는다. 그 덕분에 여러 개의 @Configuration 클래스 사이에 상호 DI가 가능해졌다. 또 @Configuration은 @Component를 메타 애노테이션으로 가지고 있다. 그 덕분에 자동 스캔의 대상이 된다. 굳이 XML에 빈으로 등록해줄 필요가 없다.

@Component가 붙은 클래스가 빈으로 등록되듯이 @Configuration 클래스도, 비록 설정만을 위한 것임에도 정식 빈으로 등록된다. 언제든 getBean()으로 가져와 사용할 수 있다. 이쯤 되면 @Configuration은 @Component의 일종이라는 것을 눈치챘을 것이다.

그런데 그 반대도 가능하다. @Autowired가 <bean>으로 등록되는 일반 빈이나, @Component 자동스캔 대상 빈이나, @Configuration의 설정을 위한 빈에 모두 적용되는 것처럼, 메소드 레벨에서 빈을 정의하는 @Configuration용 @Bean도 일반 빈에 그대로 적용된다.

무슨 말인가하면 @Configuration이 붙지 않은 빈, 예를 들어 @Component 자동 스캔 대상 클래스의 메소드에도 @Bean을 붙이면 그 자체로 하나의 빈 설정이 되버린다는 사실이다. 굳이 @Component 조차도 필요없다. 어떤 빈이든 @Bean만 붙이면 그 자체로 완벽한 팩토리 방식의 메소드를 이용한 빈 설정으로 인식되서 새로운 빈이 하나 추가된다.

이제는 굳이 <bean> 태그에 factory-method를 선언해줄 필요도 없게 되었다는 말이다.


하지만 일반 빈에서 @Bean을 사용하는 것은 사실 혼란의 가능성이 있다. 기억을 더듬어보면 3.0 개발 중에 @FactoryBean이라는 이름의 애노테이션이 존재했던 적이 있다. 그것을 더 일반화 시켜서 그냥 @Bean이라는 이름으로 통합한 것이다.

하지만 @Configuration에서 사용되는 @Bean과 @Component에서 사용되는 빈은 그 성격이 다르다.

최신 레퍼런스 매뉴얼에 보면 이런 설명이 나온다. 굵은 글씨로 표시한 부분을 잘 이해해야 한다.

The @Bean methods in a Spring component are processed differently than their counterparts inside a Spring @Configuration class. The difference is that@Componentclasses are not enhanced with CGLIB to intercept the invocation of methods and fields. CGLIB proxying is the means by which invoking methods or fields within @Configurationclasses. @Bean methods create bean metadata references to collaborating objects. Methods are not invoked with normal Java semantics. In contrast, calling a method or field within a @Component classes @Bean method has standard Java semantics.

@Configuration안의 @Bean은 메소드를 호출하는 것으로 DI가 가능하다. JavaConfig 방식이다. 이를 위해서 @Configuration빈은 CGLib을 통해서 enhanced 된다. 왜냐면 @Bean메소드로 정의된 빈이 싱글톤이라면 메소드를 여러번 호출해도 항상 동일한 오브젝트가 리턴되는 것이 보장되야 하기 때문이다. 따라서 이건 normal Java semantics가 아니다. @Configuration 클래스는 자바코드 표현을 차용한 DSL일 뿐이다. 자바코드의 semantic과 다르게 동작한다.

다음은 @Configuration 안에서 빈을 정의한 코드이다. 여기서 printer() 메소드를 호출하는 것으로 ref=”printer”와 같은 효과를 낸다. 하지만 자바의 일반 동작방식과는 달리 아무리 여러번 printer()를 호출해도 매번 동일한 오브젝트가 돌아온다.

@Bean Hello hello() {

  Hello h = new Hello();

  h.setPrinter(printer());

  h.setSubPrinter(printer());

}

@Bean Printer printer() {

  return new Printer();

}

반면에 같은 @Bean이지만 @Component나 일반 빈에서 사용되면 그 때는 standard Java semantics로 동작한다. 그 말은 enhanced되지 않는 다는 뜻이며 메소드 호출로 DI를 구성하는 것은 심각한 오류를 낳게 될 수 있다는 점이다.

이 때문에 @Component의 @Bean 안에서의 DI구현은 다른 빈을 메소드 파라미터 인젝션을 사용해서 레퍼런스를 받은 후 그것을 사용해야만 한다. 안그러면 아주 심각한, 찾기 힘든 버그가 발생할 것이다. 예를 보자. @Configuration과 비슷해보이지만 DI부분은 확연히 다르다. 여기서 publicInstance빈이 싱글톤 스코프를 보장받으려면 이를 참조하는 다른 @Bean에서는 절대 메소드를 직접 호출해서는 안된다.

이 클래스의 설정의 의미를 명확히 이해할 수 있고 @Configuration에서 쓸 때와의 차이점을 명확히 구분할 수 있으며, 이런 식으로 실전에서 자유자재로 구성할 수 있다면 스프링 3.0의 심오한 DI 세계를 마스터하는데 첫 발은 디딘 것으로 자신해도 좋을 것이다.

@Component 
public class FactoryMethodComponent {

    private static int i;

    @Bean @Qualifier("public") 
    public TestBean publicInstance() { 
        return new TestBean("publicInstance"); 
    }

    // use of a custom qualifier and autowiring of method parameters

    @Bean @BeanAge(1) 
    protected TestBean protectedInstance(@Qualifier("public") TestBean spouse, 
                                         @Value("#{privateInstance.age}") String country
) { 
        TestBean tb = new TestBean("protectedInstance", 1); 
        tb.setSpouse(tb); 
        tb.setCountry(country); 
        return tb; 
    }

    @Bean @Scope(BeanDefinition.SCOPE_SINGLETON) 
    private TestBean privateInstance() { 
        return new TestBean("privateInstance", i++); 
    }

    @Bean @Scope(value = WebApplicationContext.SCOPE_SESSION, 
                 proxyMode = ScopedProxyMode.TARGET_CLASS) 
    public TestBean requestScopedInstance() { 
        return new TestBean("requestScopedInstance", 3); 
    } 
}

한가지 아쉬운 것은 이런 혼란을 피하기 위해서 @Component에서는 @Bean 대신에 다른 이름을 사용하는 것이 좋지 않았을까 하는 점이다. 뭐.. 나름 고민 끝에 @Bean으로 통일한 것이긴 하겠지만.


Spring 3.0은 2.5에서 일부 시도한 DI의 변화를 거의 극한까지 밀어 붙여서 지금까지 나온 어떤 DI기술보다 가장 심오하고 이상적인 레벨의 IoC/DI 프레임워크로 변신했다. 스프링 쫌 한다는 사람도 3.0을 제대로 쓴다고 말하려면 IoC공부에 꽤 많은 시간을 다시 투자할 각오를 하는게 좋을 것이다.

나도 아직 헷갈릴 정도로.. 쉽지 않다.


출처 - http://toby.epril.com/?p=939


Posted by linuxism
,